
Instructions for use – MicronJetTM
The MicronJetTMis a micro-needle device that is mounted on a standard syringe in the same manner as a conventional needle.
The MicronJetTM comprises an integral array of micro-needles:
- MicronJetTM 600 – 0.6mm length, 3 micro-pyramids.
- MicronJetTM 800 – 0.8mm length, 3 micro-pyramids.
The MicronJetTM is used to inject liquid substances, allowing for controlled intradermal delivery in any procedure which requires administration of substances to the dermal
compartment.
Please read the full Instructions for Use document to learn about the indications, contra-indications and limitations, warnings and precautions, adverse events, storage and handling, supply method.
Questions and Answers:
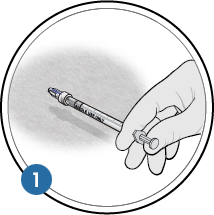
- Hold syringe flanges between thumb and fingers.
- The blue line must face you at all times.
- Syringe flanges are not the orientation guide as they may not always be parallel to the blue line; use the blue line for orientation.
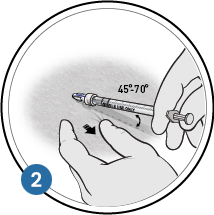
- Stretch the skin downwards throughout the entire injection.
- Insert the device at a 45*-70° angle (flatten as required to reduce injection pressure).
- Press the device into the skin until a shallow indentation is formed.

- Inject slowly, expect strong resistance.
- A white wheal (bleb) will form at the injection site.
- Upon completion, wait 3 seconds and remove syringe.